Blog

A trick for using Notes in macOS
Here’s a trick for those who use Apple’s Notes app for storing bits of information. By default, Notes in macOS gives you a single window, with each note listed in a sidebar. But what if you want to see two notes at once? Or keep one always available no matter what else you’re doing? Select the desired notes in the sidebar by Command-clicking them, and then choose Window > Float Selected Notes to open them in their own windows. Or, just double-click them in the sidebar! Then, to make sure one or more of those windows is never obscured by another app, make it active and then choose Window > Float on Top. It’s still a normal window that you can move and resize and close, but no other app will appear over it. See how Safari is the frontmost app below, but the Notes window is on top?

Spring Break Hours

Getting the Most out of Your Reminder Lists with Siri
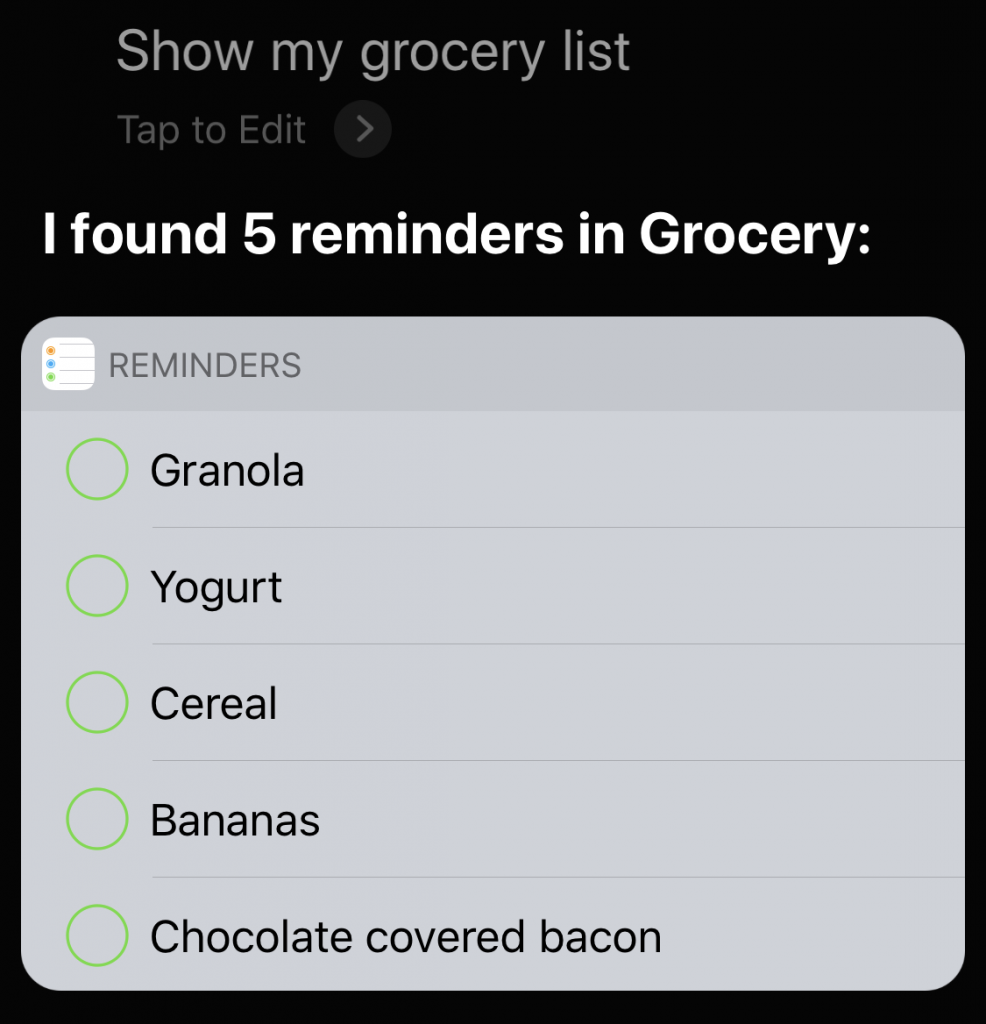
Do you create reminders with Siri on the iPhone? Those reminders are automatically added to your default list, which you set in Settings > Reminders > Default List. That’s great generally—“Hey Siri, remind me to update watchOS tonight at 11 PMâ€â€”but less good when you want to maintain different shopping lists. For instance, create a list called “Grocery,†and then you can tell Siri, “Put chocolate-covered bacon on my Grocery list.†Want to get fancy? Make a list called “Hardware,†and then tell Siri, “Add birdseed to my Hardware list, and remind me when I arrive at Home Depot.†You may have to pick the correct Home Depot location from a list, but then you’ll receive an alert reminding you to buy birdseed when you pull into the parking lot. To look at any list via Siri, just say something like “Show my Grocery list.â€

Using the Emergency SOS feature on your iPhone or Apple Watch
Have you ever needed to call emergency services from your or someone else’s iPhone? Almost by definition, such calls take place at stressful times, and it can be hard to remember what to do. Or, if you’ve been in an accident, it might be difficult or impossible to navigate the iPhone’s interface. In iOS 10.2 and watchOS 3 and later, Apple added the Emergency SOS feature to help.
Emergency SOS does three things:
- First, it calls emergency services, using whatever number is appropriate for your location, which could be particularly helpful when you’re traveling abroad.
- After your emergency call ends, Emergency SOS sends a text message with your location to emergency contacts that you’ve set up previously in the Health app.
- Finally, it displays your Medical ID for first responders so they can be aware of things like medication allergies. You create your Medical ID in the Health app as well.
How you invoke Emergency SOS varies slightly depending on which Apple device you have:
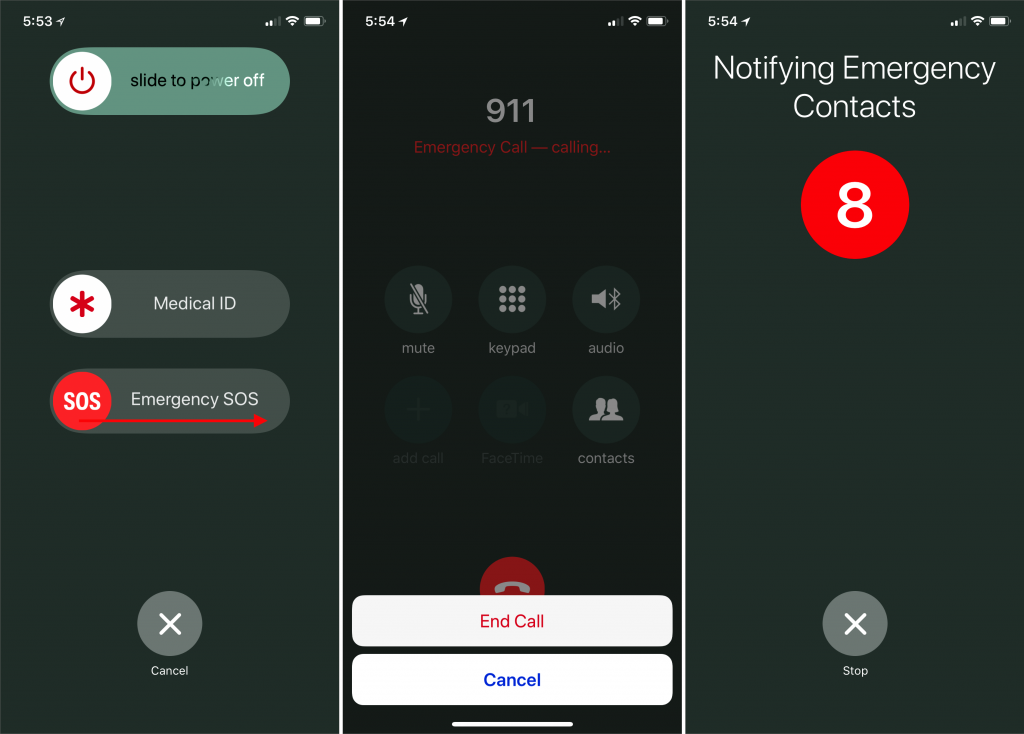
- On the iPhone 8, iPhone 8 Plus, and iPhone X, press and hold the side button and either of the Volume buttons until the Emergency SOS slider appears. Either drag the Emergency SOS slider to call emergency services right away, or just keep holding the side and Volume buttons. If you continue holding the buttons down, a countdown begins and an alert sounds; at the end of the countdown, the iPhone automatically places the call, a feature that Apple calls Auto Call.
- On the iPhone 7 and earlier, rapidly press the side button five times to bring up the Emergency SOS slider. Drag the slider to call emergency services. (The quintuple-click can work on the new iPhones too; it’s an option in Settings > Emergency SOS.)
- The Apple Watch acts like the newer iPhones. Press and hold the side button to bring up the Emergency SOS slider, or keep holding the side button to start a countdown after which the Apple Watch will call emergency services automatically via Auto Call. The Apple Watch must be connected to your iPhone, be on a known Wi-Fi network and have Wi-Fi Calling enabled, or be an Apple Watch Series 3 with a cellular plan.
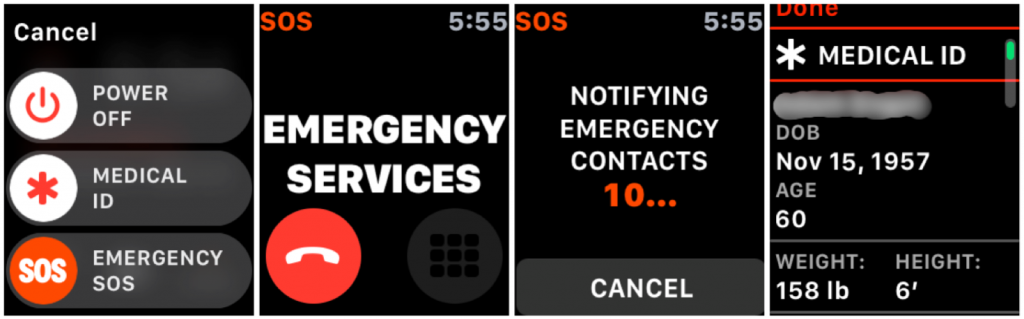
It’s only human to want to test this in a non-emergency situation, and you can do so without actually placing the call. On both the iPhone and the Apple Watch, there will be a red hangup button you can tap, followed by an End Call or Stop Calling button. Similarly, you can cancel notifications of your emergency contacts.
You’ll also want to stop calls if they’re placed accidentally—we know someone who had his hand in his pocket in such a way as to press the Apple Watch’s side button long enough to start the call, and since he was in a noisy environment, he didn’t hear the alert or notice anything until the 911 service called his iPhone back.
To add emergency contacts—the people who you’d want notified if you were in an accident, for instance—follow these steps on your iPhone:
- Open the Health app, and tap the Medical ID button at the lower right.
- Tap Edit, and then scroll down to Emergency Contacts.
- Tap the green + button to add a contact.
- Select the desired person, and when prompted, pick their relationship to you.
- Tap Done to save your changes.
Two notes. First, if you’re concerned about activating the Auto Call feature inadvertently, you can turn it off in Settings > Emergency SOS on the iPhone, and for the Apple Watch in the Watch app, in My Watch > General > Emergency SOS.
Second, bringing up the screen with the Emergency SOS slider also automatically disables Touch ID and Face ID, such that you must enter your passcode to re-enable them.
We sincerely hope that you never have to use Emergency SOS, but that if you do, it proves to be a faster and more effective way of contacting emergency services.

Ransomware: Should You Be Worried?
Let’s start by saving you a whole lot of reading: No. That said, malware makes headlines regularly these days, and although Macs are targeted far less than Windows PCs, Mac users still need to remain vigilant. A particularly serious type of malware is called “ransomware†because once it infects your computer, it encrypts all your files and holds them for ransom.
What is ransomware? It’s a serious type of malware so-called because once it infects your computer, it encrypts all your files and holds them for ransom.
Macs are targeted far less than Windows PCs. In fact, I can only think of a few pieces of ransomware that have been directed at Mac users:
- The first, called FileCoder, was discovered in 2014. When security researchers looked into its code, they discovered that it was incomplete, and posed no threat at the time.
- The first fully functional ransomware for the Mac appeared in 2016, a bit of nastiness called KeRanger. It hid inside an infected version of the open source Transmission BitTorrent client and was properly signed so it could circumvent Apple’s Gatekeeper protections. As many as 6500 people may have been infected by KeRanger before Apple revoked the relevant certificate and updated macOS’s XProtect anti-malware technology to block it.

- In 2017, researchers discovered another piece of ransomware, called Patcher, which purported to help users download pirated copies of Adobe Premiere and Microsoft Office 2016. According to its Bitcoin wallet, no one had paid the ransom, which was good, since it had no way of decrypting the files it had encrypted.
If you’re not pirating software or using BitTorrent—or even know what BitTorrent is?—ransomware isn’t something to worry about. Sure, it’s likely that malware authors will unleash additional Mac ransomware packages in the future, but the probability of it hitting your Mac is incredibly small.
There are a few reasons for this. First, Apple’s Gatekeeper technology protects your Mac from malware by letting you launch only apps downloaded from the Mac App Store, or those that are signed by developers who have a Developer ID from Apple. Since malware won’t come from legitimate developers (and Apple can revoke stolen signatures), Gatekeeper protects you from most malware.
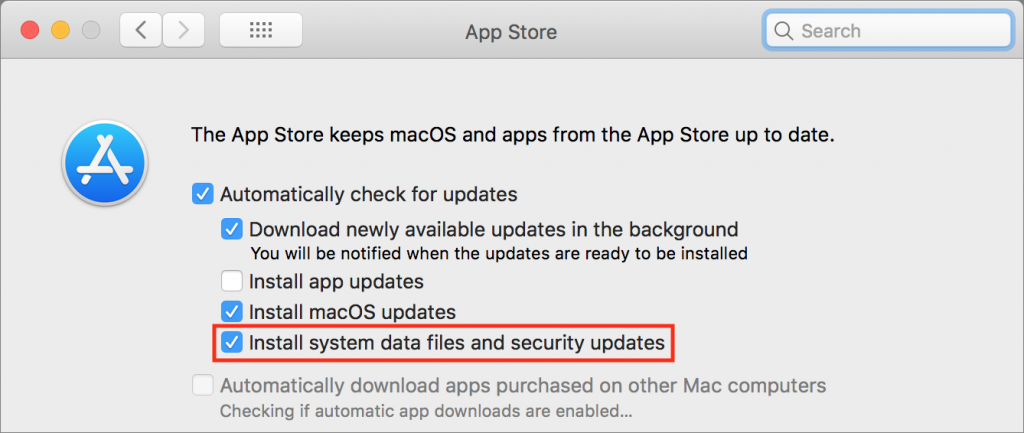
Second, Apple’s XProtect technology takes a more focused approach, checking every new app against a relatively short list of known malware and preventing apps on that list from launching. Make sure to leave the “Install system data files and security updates†checkbox selected in System Preferences > App Store. That ensures that you’ll get XProtect updates. Similarly, install macOS updates and security updates soon after they’re released to make sure you’re protected against newly discovered vulnerabilities that malware could exploit. If you’re a Sentinel+ member, we do this for your Mac automatically.
(Remember: On the Mac, you must be running one of the last three operating systems (presently 10.13, 10.12, or 10.11) in order to receive Apple security updates.)
Although regular backups with Time Machine are usually helpful, KeRanger tried to encrypt Time Machine backup files to prevent users from recovering their data that way.
The best protection against ransomware is a versioned backup made to a destination that can be accessed only through the backup app, such as an Internet backup service like Backblaze. The beauty of such backups is that you can restore files from before the ransomware encrypted them. This is one reason we say that you should have your “data in three places, one of which is off-site.”
If you ever are infected with ransomware, don’t panic, and don’t pay the ransom right away. Contact us so we can help you work through your options, which might entail restoring from a backup or bringing files back from older cloud storage versions. There are even decryptors for some Windows ransomware packages, and such utilities might appear for hypothetical Mac ransomware as well.
There are plenty of things to worry about in this world. Happily, ransomware on your Mac isn’t one of them.
Trading Faces: Picking a Key Photo for People Photos Recognizes
Apple’s Photos app is remarkably good at identifying people in your snapshots and collecting all the pictures that contain a particular person into a group in its People view. At its top level, the People view shows a thumbnail photo for each person, picking one automatically from all the available photos. Needless to say, it doesn’t always pick the photo you want, so if you dislike what’s there, you can change it easily on the Mac. In Photos, click People in the sidebar and double-click the thumbnail of the person you want to change. If necessary, click Show More to see all their photos, then Control-click the desired photo and choose Make Key Photo from the contextual menu.


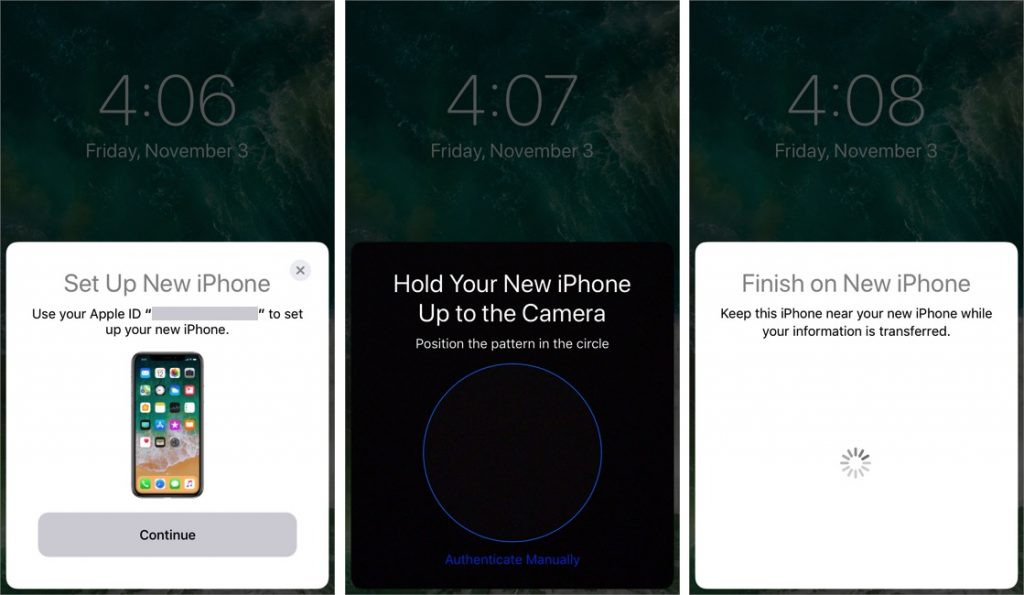
Quick Start: A new (and fast) way to set up your new iPhone
When you’re unboxing a new iPhone, it’s time to think about how you’ll move your digital life from your old iPhone to the new one. If your old iPhone is running iOS 11, you can use Quick Start, a new iOS 11 feature that makes the transfer easy. Just turn on the new iPhone, set it next to the old one, and tap Continue when asked whether you want to use your Apple ID to set up your new iPhone. An animation appears on the new iPhone for you to scan with the old iPhone—once you’ve done that, follow the rest of the instructions to enable Touch ID or Face ID and then restore your data and settings from your most recent iCloud backup (you can update the backup first if necessary). Leave the two iPhones next to each other while data is being transferred, and if possible, keep the new one plugged in and on Wi-Fi after setup so it can download your apps, photos, and music from Apple’s cloud-based services.
We help people with Apple technology.